Exposure compensation is a setting available on most cameras today. Generally, only the simpler point and shoot cameras fail to offer exposure compensation adjustments.
It is an adjustment that a lot of folks fail to ever understand or use. For those of you in this category, I’m going to try to help you understand what it does and when you should use it.
What Does Exposure Compensation Do?
From one of my earlier posts on the full auto mode of cameras, we know that cameras have a mind of their own. They are built to balance the exposure of scene based on a middle gray (or 18% gray).
This balance of light and dark is usually evaluated based on the entire frame that you see either in the camera’s viewfinder or the LCD. Some cameras offer different ways to evaluate the scene (metering modes), such as “spot” or “center-weighted.” These are very helpful in many situations; however, we will revisit these concepts later.
Exposure compensation allows you to increase or decrease the exposure of a scene. Essentially, you are telling the camera, “I see what you’re doing there with your ‘balanced’ exposure, but I want it to be brighter (or darker),” as the case may be.
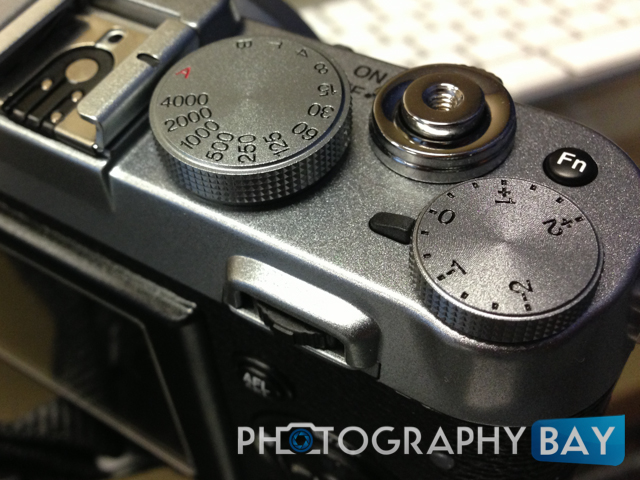
Exposure compensation is generally adjustable in 1/3 or 1/2 EV or “stops.” Each full “stop” adjustment either doubles or halves the amount of light reaching the image sensor depending on whether it is a +1 or -1 adjustment.
Accordingly, an exposure compensation adjustment of +1 EV will result in an image that is twice as bright as the base exposure. Likewise, an exposure compensation adjustment of -1 EV will result in an image that is half as bright as the base exposure.
How Exposure Compensation Works in Various Camera Modes
Exposure compensation is a quick and easy way to alter any exposure when you are shooting a Program, Aperture Priority or Shutter Speed Priority modes, which are generally regards as more “pro” automatic modes. Many cameras will lock the controls for exposure compensation in Auto or certain Scene Selection modes.
In Program mode (represented as “P” on your camera’s mode dial), the camera can adjust the aperture or shutter speed in order to accommodate adjustments that you make to the exposure compensation.
For example, if your camera thinks a given scene should be exposed (i.e., the camera meters the scene) at f/5.6 and 1/250s, then an adjustment of +1 EV on the exposure compensation setting may result in a setting of f/5.6 and 1/125s OR f/4 and 1/250s.
Do you see what happened in those +1EV adjustments?
By dropping the shutter speed to 1/125s, the camera doubled the amount of light reaching the sensor (because the exposure lasts for twice as long). Likewise, by opening the aperture to f/4, the camera doubled the amount of light reaching the sensor (because the aperture was opened a full stop).
The camera’s processor may consider things like the lens max aperture and the focal length of the lens (in consideration of camera shake caused by shutter speed to focal length ratios) in determining which values to adjust in Program mode. Whatever those calculations may be, the camera will adjust as needed to gain a stop of light for a +1 EV adjustment or halve the light for a -1 EV adjustment.
Similar to adjustments in Program mode, exposure compensation can also be used in Aperture Priority and Shutter Speed Priority modes. However, in these modes, one element of exposure is locked and will not be changed when exposure compensation is used.
In Aperture Priority mode, the aperture remains at your chosen setting. Accordingly, the camera will adjust shutter speed to accomodate exposure compensation adjustments. In the first example that I mentioned of f/5.6 and 1/250s, the camera would adjust the shutter speed to 1/125s for a +1 EV adjustment.
Similarly, in Shutter Speed Priority mode, the shutter speed will remain at your selected setting. As a result, the camera will adjust the aperture when exposure compensation is used. Using the above example of f/5.6 and 1/250s as a metered scene, the camera would adjust the aperture to f/4 for a +1 EV adjustment.
In both Aperture Priority and Shutter Speed Priority modes, the camera may also adjust ISO if you have the ISO set to automatic mode.
When to Use Exposure Compensation
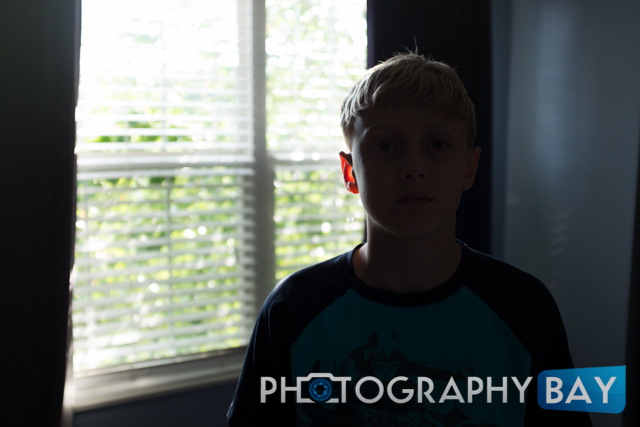
Standard Camera Metering in Aperture Priority Mode – Note the camera exposed the scene for the window in order to average the dark and light portions of the image. Because the window is very bright, the subject turned out dark.
One of the common times to use exposure compensation is when your main subject is brighter or darker than your entire metered scene. This occurs often when you have a backlit subject (e.g., subject in the shade with full sun scene or window in background) or when your subject has a lot of light on them, but the rest of the scene is dark (e.g., a wider shot of a band/singer in a concert).
In some cases, it may be better to switch to manual mode, and a lot of photographers would prefer this anyway. However, there are many cases where photographers are more comfortable with a camera-metered scene or where it’s simply quicker to hit a +1 or -1 on the exposure compensation dial, get the shot and be done with it.
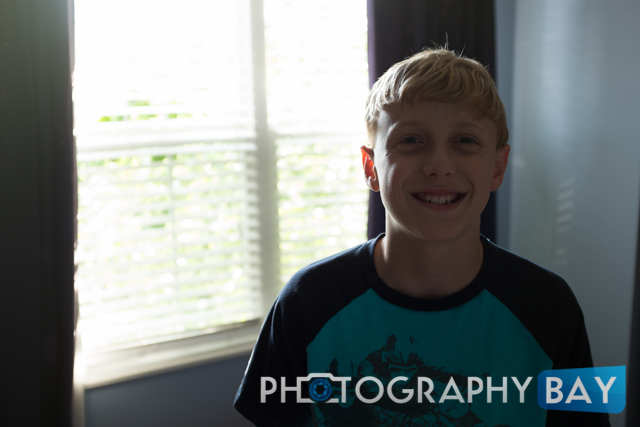
Adding +2 EV via the exposure compensation dial to the same scene shown above, the camera exposed the scene 2 full stops brighter than it metered the scene at. As a result, you can make out the subject’s face. While we could use a little more compensation (or perhaps some fill flash), we are getting closer to exposing for the subject rather than the window (or overall scene).
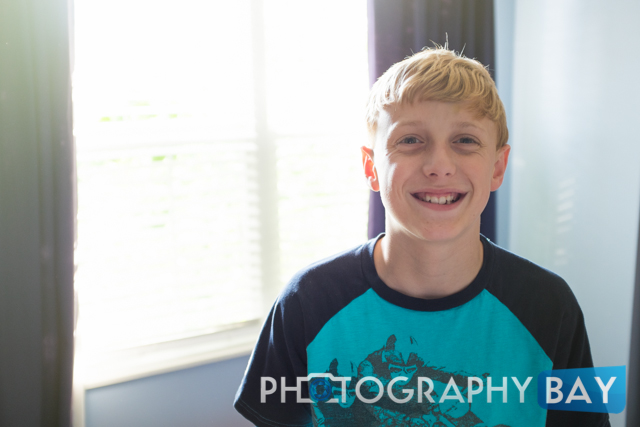
To further demonstrate how far off camera metering can be, this is post-processed version of the +2 EV image above. I added an additional +1.4 EV boost to the exposure in Lightroom to get the image close to a proper exposure for the subject. So, the camera actually underexposed the subject by 3.4 stops in metering this scene.
If your subject is backlit, the camera is going to meter that backlight and make your subject darker in order the “level” that scene out at 18% gray. This can be corrected by increasing the exposure compensation, by telling the camera that this scene should be +1/3 EV, +1 EV or +2 EV brighter than what it “thinks.”
It is the same thing for bright subjects in dark areas. Get the exposure right for the subject and let the background be as dark as it needs to be. If your subject is blown out to white, then the picture isn’t worth taking. Dial the exposure compensation down by -1 EV or whatever looks right to you for the subject.


Thank you, this was very helpful!
Glad I could help gare.
Everything is very open with a precise description of the issues.
It was truly informative. Your site is very helpful.
Many thanks for sharing!
Couldn’t you just change to spot metering to meter your subject.?
I’m sorry, it’s really annoying that your article doesn’t explain how to adjust exposure compensation!?… It just explains what it is and what it does?
Hey Hector. Good point but it varies from camera to camera. Some require you to dig into the menu and others have a wheel (like in the top photo) that you can rotate for +/- exposure compensation.
The description “Exposure compensation” is excellent for everyone who wants to understand how to use the camera and take a picture when the background of the object is a window, bright clouds, etc. Thanks for your generosity.