If you’ve had difficulty understanding what the new PocketWizard MiniTT1 and FlexTT5 can do for you, take 7 minutes and watch this video. Mark from the SnapFactory Blog does a great job of introducing the technology that these devices offer. And, he shows you how they work in a shoot, along with some sample images. Good stuff Mark.


Tips For Shooting Sunsets
Shooting sunsets is something that isn’t as easy as one would think. Keep in mind that you can’t always be in the right spot at the right time to consistently be able to get those dreamy, beautiful shots. Also remember that sunsets only last for a little while at a time and that the sun continues to go down into the horizon until it isn’t visible anymore. With all this going against you, here are some tips for photographing those beautiful sunsets.
Shoot Wide, Crop Later
Shooting wide allows you to get a view of the entire sky. Depending on the timing, it can also show how the light is hitting the surrounding areas. If you shoot wide first, you’ll be able to fix the shot later in post-production where you can recompose how to wanted it to look. Most consumer zoom lenses close the aperture up as you zoom in. This can create an unbalanced shot depending on how you are metering what’s in front of you. In my experience, primes do the best in this situation.
Part of this also depends on your own positioning to take the shot. Similarly in shooting fireworks, your position to accomplish the type of shot that you want is critical because the sunset happens quicker than you’d think.
Set Your Depth of Field Correctly, Use Neutral Density Filters
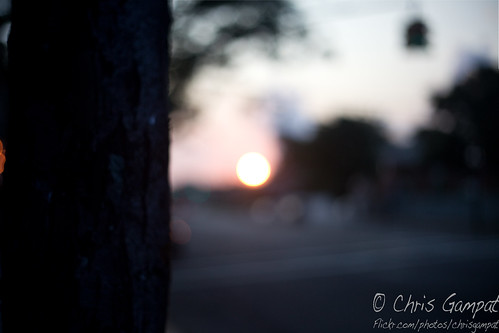
While shooting your picture, keep in mind your vision. Do you want the entire sky in focus such as in the picture above? Or perhaps you’d like the sunset to be nothing else but blurry and beautiful bokeh like the first shot in this posting. Either way, figure that all out is worth it in order to save time and getting your shot perfect.
Additionally, you may want to try a neutral density filter. ND filters allow for a shallower depth of field. If the sunset is above water, the ND filter will allow for a slower shutter speed in order to achieve a really slow and milky water effect. Other ideas could be perhaps setting your camera to take the picture at different temperature or exposure brackets. When it’s all done with, you can combine the photos in Photoshop to look exactly the way you want it to. While ND filters will slow down your shutter-speed, generally try to keep it fast enough to not get an overexposed picture or the sun trailing. Additionally, shoot at the widest aperture that you can.

You Don’t Always Need the Sun To Make a Nice Shot
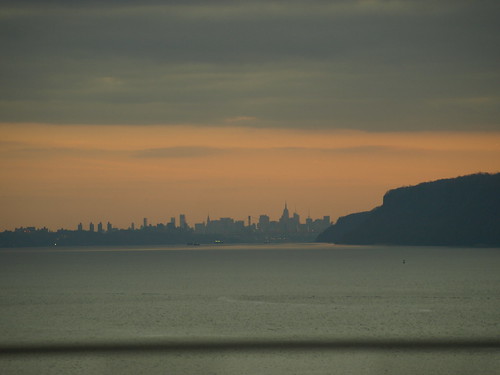
Yes, despite the fact that you are shooting a sunset your viewers can know that you are doing it without shooting the sun. In the above two shots you don’t see the sun at all but you can easily tell that the sun is going down. Instead, the focusing is on different areas that work for the shot because of positioning and saturation of colors. Everyone that looks at those shots always says, “Nice sunset.” or something else along the lines.

If You Can’t Get the Sun, Get the Surrounding Sky
A great example of this is what you may have seen in the news recently with the clouds. Every now and then, the sky will literally turn into a pinkish color that is very saturated and almost orangish-red. We get this every now and then in New York City and it’s quite lovely but also very scary too because you sometimes don’t know what is really going on. But if you just shoot the sky with buildings in front or trees of some sort you can achieve a very lovely shot.
What About Your Tips?
Do you have some sunset tips to add? Let us know in the comments or feel free to share your shots in the forum.
Tips For Shooting Wildlife
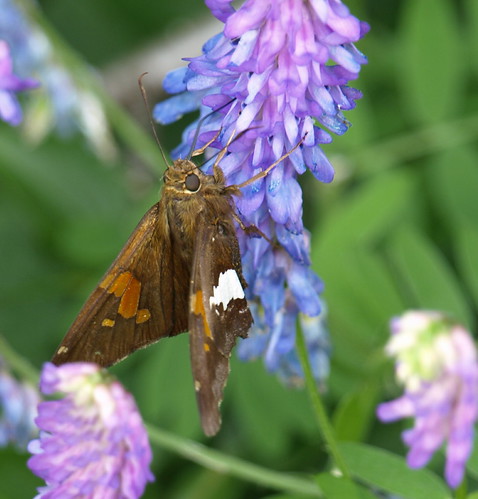
No matter how excited we get, there are certain things we need to remember when photographing wildlife. This is especially true when you are looking for animals that are notoriously hard to capture on camera. Whatever you do though, you need to keep in mind that practice makes perfect and that perseverance will eventually get you that shot. Here are a couple of reminders for your reference. [Read more…]
Concert Photography – Capturing the Essence of a Concert
The following post is by New York-based photographer and artist Angela Datre, who provides a thorough introduction into concert photography and delves into what it takes to capture the essence of a concert. Learn more about her at the end of this post.

“It’s very hard with a still photograph to capture the action of a concert. You try to see something in the face, the body, the lighting…Once I see a good shot in the viewfinder, it’s gone. The music gets inside of me, it’s in my brain, I’m close enough to the stage so that the vibration from the speakers is making my skin tingle, and I’m filling the viewfinder with the musician. I just always feel high.”
-Baron Wolman, Concert Photographer
When it comes down to it, I take photographs at the shows I attend because I can’t not take photographs when I am there. I feel awkward if I am not all the way up front-able to see everything, shoot everything. It started with snapshots in the crowd when I was younger and has now become a lifestyle, an obsession.
I thought I would write a blog post on live music photography because it is something that is so near and dear to me. And I’ll admit it; I started off the same way many young photographers start out-bringing a point and shoot digital camera to shows and shooting with a slow-shutter speed or tilting the camera so the image is askew. It took me some time to realize that there is so so much more you can do with live music photography and I feel the need to share what I have learned with others. [Read more…]
How To: Single-Image HDR
 The following post on HDR photography is by Atlanta based photographer Zach Matthews. Learn more about him at the end of this post.
Over on The Itinerant Angler forums, we’ve spent some time bad-mouthing HDR, and to some extent that is fair. When HDR is over done, it can result in a jacked up, unnatural image.
However, the fact remains that the human eye can see a lot broader dynamic range (meaning brights and darks) at the same time than a camera can. This is because the human eye can vary its “ISO” or exposure sensitivity locally in just one area rather than only across the whole image. This is what allows you to see the inside of a darkened room as well as the brightly lit world out the window at the same time. A camera could only see one or the other.
We have a number of situations in streamside photography (the area most of us work in – but don’t think this technique is limited to that) where we need a broader dynamic range than the equipment allows. The classic situation is one of side light, where light from beside the subject is lighting it (usually a person casting) beautifully, but the background is dark. At times, this can look unnatural. [Read more…]
- « Previous Page
- 1
- …
- 12
- 13
- 14