Last week, I showed you a couple of images that I processed with a goal of creating an extended dynamic range. One was processed in Lightroom from a single image and one was processed from three separate images in Photomatix to create an HDR image. This grew largely from an experiment with a Canon 5D Mark II RAW file to see how far I could push the dynamic range from a single file in Lightroom 2.5. Nothing scientific. Just a little fun.
If you missed it, here is the original post.
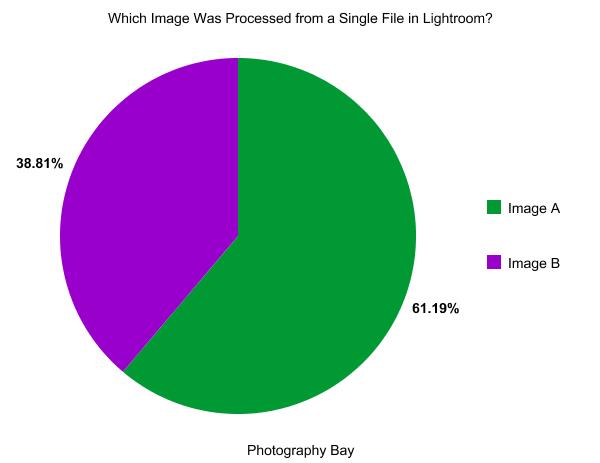
To make things a little more interesting, I posted both images with metadata stripped and asked you to decide which was a single image processed in Lightroom and which was a combination of 3 images processed in Photomatix. Take a look at the results of that poll below.

As of today, 353 of you voted in this poll. Over 60% of those who voted (216 votes) got the answer wrong. One observer pointed out that the carpet in Image A looks blown out. That may have tripped up several of you; however, I took another look at the highlights in the carpet and they weren’t clipped. Although bright, there is still plenty of detail in there. Here’s a screen capture showing highlight clippings (see the red colored areas) in Image A (the Photomatix processed image):

I’ll also show you the original Image B that was processed in Lightroom compared to the final edit Image B created for the HDR poll:

As I noted in the original post, I was really impressed with how far Lightroom could take the 5D Mark II’s RAW file by itself. I really felt like it gave me a lot of details back in dark areas of the photo. I purposely didn’t manipulate the image in any other editing software because I wanted to make it about Lightroom alone. If I had pushed the image further in Photoshop, I think we would be much closer.
My biggest problem with Image B was that I had a real hard time making the image contrasty after reigning in highlights and shadows in Lightroom. Additionally, I really had to kick saturation and vibrance to get decent color out of Image B in Lightroom. For this reason, I felt like Image A had more pop to it since the color hadn’t been raked over the coals to get the exposure balance right. To me, Image B just looked a little flatter.
I also want to point out again that I am new to using Photomatix and this may not have been an ideal or fair “test”. Again, we’re having fun here. One commenter, Steve, pointed out that HDR really excels in settings like this when you have a daytime scene outside the windows, which would normally be blown out in an ordinary 0EV exposure. I agree with Steve that this would likely have presented a much greater challenge for Lightroom. Maybe we’ll try this one in the future, eh?
Additionally, Mike Miriello left a comment pointing out his recent video podcast on using Photomatix in real estate photography. If you aren’t familiar with the software, he provides a relevant and quality overview of what we’re talking about here with Photomatix. Here’s the link to his podcast. It’s really worth taking the 10 minutes or so to watch the podcast and see how Photomatix works for Mike in his professional real estate work.
Thanks to everyone who voted and commented. I had a lot of fun with this one and learned a few things along the way. Look for more coverage on Photomatix and HDR imagery soon.


I think one of the big differences among the images is the plant on the left corner of the room. The Photomatix processed image shows a bit of a green halo along the wall on the left side of the plant.