You’re in a big, dreamy city at night. Mesmerized by the bright lights contrasting with the beautiful, deep blackness of the night sky, you want to take pictures and capture the stunning gorgeousness before you. However, if you don’t have a Full-Frame DSLR like a Canon 5D MK II or Nikon D700, then chances are that you will have a harder time capturing cleaner images as the smaller sensors don’t have the pixel density or algorithms programmed in to them to deliver the shots that you want. Here’s a couple of things to remember when you go out shooting at night and to get the image almost perfect the first time around with little post-process development.
The following article has been written after many trials with a Canon XSi and Olympus E-510. The former has an APS-C sized sensor while the latter is a 4/3rds camera. Each has their own limitations and differences that can be overcome while traveling with a small kit. I never shoot on Auto: it’s either Manual, Aperture, or Program for me.
Slow Down
As excited as you may be with taking your night photos, what you have to remember is that you’re going to need to slow down and cool your nerves and breathing. You’ve got a couple of options. Since we’re not bringing a tripod or expensive flash system with us then you could flip on the DSLR’s Live View mode, place the camera down on a flat and steady surface of some sort, lower the ISO down to the lowest setting and snap the picture. Before you do that, you may also want to set a delay of some sort to ensure that your camera remains the stillest that it possibly can.
The other option is crank up the ISO. On the camera’s I’ve used, I almost never shot above ISO 400 because of the fact that the image quality isn’t that clean. If you’ve got something like the Canon T1i, Nikon D300, or Nikon D90 then you can probably afford to crank the ISO up to 800 or 1600 and still get very clean and beautiful shots. In which case, you can hand-hold the camera and look through the viewfinder to compose your shots. If you’d like, you can put on Noise Reduction or deal with it in post production via PhotoShop.
Lastly, you can use a small Gorillapod.
Use All Available Light That You Can
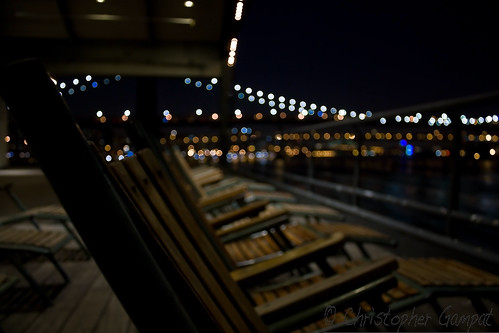
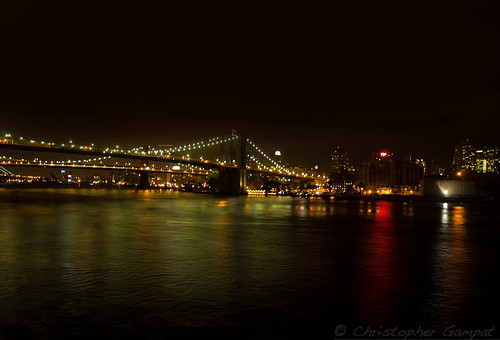
Using whatever light is around you can help you our tremendously to achieve a balanced image on the histogram. I’ve found that placing your camera in a well-lit area can allow more light to seep onto the sensor vs standing in complete darkness and shooting a bright subject. This is because extra light provides a nice ambient to the scene in many cases (I’ve used kit lenses with F3.5-F5.6).
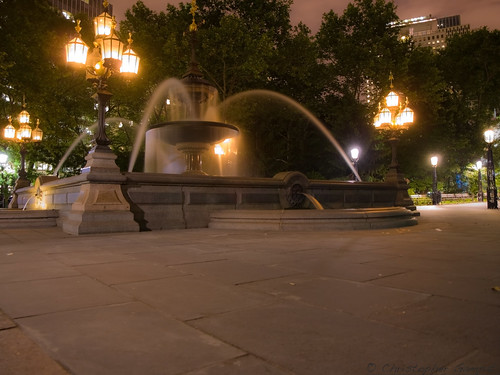
In the above image, I placed camera down in an area underneath one of the light poles. It allowed for extra light to seep into the image and for it to be taken at a long exposure when this was shot at around 11pm.
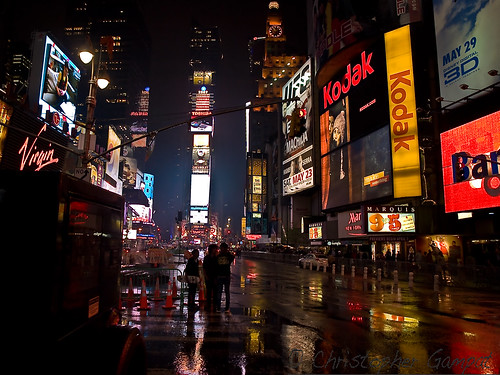
In the image above, the rain had just fallen in Times Square. Because of the fact that there was so much water on the ground and Times Square is always such a well lit area, I was able to shoot this image perfectly fine at ISO 400 and deliver a clean shot with little to no post-processing. The rain allowed the lights to be reflected, which doubled the available lighting. In this case, shooting a city right after it has rained is very advantageous. However, I do not recommend standing/stopping in the middle of the street the way I did to get this shot as that can be very dangerous. I do recommend holding your breath to take it while hand-holding your camera.
Of course you may not want a balanced image though; as is the case with the above image. The sky is very photoshopped. The clouds on this night were very visable and I felt messed up the image, but if I shot it as a faster shutter speed then I wouldn’t achieve the look I wanted without lots of post processing. The above image only has a white balance fix, saturation fix and blending of colors in the sky to get rid of the clouds.

Practice With and Get to Know Your Camera and Lenses
This cannot be stressed enough. Your camera or lenses will not do all the work for you. It’s about becoming a better photographer and knowing the system that you’re using. Each system has features that appeals to the differnt needs of each photographer. For example, Olympus cameras generally do not do as well at High ISO shooting as Nikon or Canon. If one compares High ISO images of a Nikon to another system, they’ll see that the Nikon looks more “film-like” rather than the banding and speckles that one sees on an Olympus.
The above image has little to no Photoshop work done to it and was shot with a Canon XSi. It was done handheld at the top of Rockefeller Center in uncomfortable 42 degree weather and standing on a ledge (many stories in the air) and while trying to ensure that security wasn’t going to get angry at me. It was shot very wide and at the top of my breath in order to get a photo like this. I probably would not have been able to do this if I did not understand how the Canon system works.
Don’t ever give up either. A camera can be designed very well from the ground up, but it’s only as good as its photographer.


Great tips and examples!
Thanks!
Here is my try on long exposure + tripod –
http://www.ilanbresler.com/2009/02/under-moonlight.html
Hi Ilan,
that moon’s reflection is beautiful. What camera was that shot with? Got any EXIF data?
With regards to your first example picture under “Use All Available Light That You Can”, you state that the reflections in Times Square “doubled the available lighting”. Er, how? Sure, there was light being reflection from the road where, had it been dry, would have been close to black, but the intensity of the light sources (eg the glowing signs) is the same, regardless of how wet it is.
Your exposure value for the signs would be the same wet or dry, so to say available light was doubled in incorrect.
Thanks for the tips Chris.
Here are a few tries of mines :
http://www.flickr.com/photos/kubusclem/3474316257/sizes/l/in/set-72157617322777132/
http://www.flickr.com/photos/kubusclem/3474160213/sizes/l/in/set-72157617322777132/
http://www.flickr.com/photos/kubusclem/3474318145/sizes/l/in/set-72157617322777132/
I think the last one is too crowded, but I liked the Eiffel tower’s beam too much :).
The first two would have been better with a tripod I guess, had to do with the bridge’s rail :/. (Shot with Rebel XSi and Tamron 18-200, only lens I had then)
@ David
It’s true that the metering would would probably be the same, but don’t you think the reflected light would help to fill in the darkness of the frame? And that the glow from the street would contribute to reflected ambient light on the people on the street, effectively doubling not the quantity of light, but how much area the same light can illuminate?
Great shots. I have an Xsi myself, and was very interested in seeing the Exif data to find out the the particular settings you used to get these photos (exposure, f-stop, shutter speed, zoom, etc), but that data appears to be hidden in Flickr. Is it possible to share these details, or post the originals?
Hey Chris!
Here is some EXIF data
Camera: Nikon D50
Exposure: 30 sec (30)
Aperture: f/8
Focal Length: 45 mm
I used the 18-200mm for this shot.
Okay, here are my responses. Before that though, I invite anyone viewing this to add me as a contact on Flickr as I’m always expanding my contact list and always want critiques on how I can make my photography better. I’d be happy to do the same.:
@ David- In my experience in shooting in the studio, one can use a mirror of some sort to reflect light that is currently there and therefore double the amount of light available and fill in any shadows; which is especially useful when shooting people. What does that have to do with this? The water on the ground is acting as a mirror of some sort to fill in the shadows of what I see through the viewfinder and what the sensor sees. The metering is not the same because the effective light that one sees and that hits the sensor is doubled. If there wasn’t that much light being reflected then I wouldn’t have been able to shoot this handheld. That’s my experience at least though.
@ Clement- As I said on Flickr, I’m in love with the second one.
@ Kuyler- If there are of illuminated lighting is greater than the metering isn’t always the same.
@ Johnwys- EXIF data will be posted soon.
@ Ilan- I find the D50 an impossible camera to get my hands on but I hear it’s amazing.
I think your pictures are good. The challenge with low light is time and exposure. I like your cityspace really give a good feel for the mood.
This is a great site, with very helpful information. I hope to try out your tips soon!
Thanks, Chris, good advice. Just in support of what you’re saying: I’ve taken to carrying a tiny Coolpix camera with me when I’m travelling for business. I took this in Chicago recently handheld and through the hotel window. It’s now one of the most viewed Flckr uploads: http://www.flickr.com/photos/nigelfj/3563181566/
Chris, I see what you’re saying – you’re exposing for the shadows in this case.
The way I read it you were saying that somehow the light intensity was greater because of the reflections. You could use the same exposure settings with a dry road, and the neons would still look the same, but the road would be dark. I was just thinking of it from the other side of things.
Thought I’d throw mine in here too. I definitely required a tripod with mine however. The light was so low that I could not focus on anything, nearly pitch black out however 30 seconds gave it some light.
http://www.flickr.com/photos/justin-fritts/3679137347/sizes/o/
Waw, that’s an amazing one !
No post treatment ?
Justin, it’s an amazing shot!!
Hey guys some nice shoots here is some of my photos
http://www.flickr.com/photos/redhand1873/
P.s Chris i have added you as a contact :D anyone you would like to add me feel free ;P
I thought it’d throw a few of mine in for good measure. I mainly use a Gorillapod when I’m out and about in the city (security don’t seem to mind so much as opposed to my Manfrotto tripod).
http://www.flickr.com/photos/alexrichards/3144285027/
http://www.flickr.com/photos/alexrichards/2927264173/
http://www.flickr.com/photos/alexrichards/2910148673/
http://www.flickr.com/photos/alexrichards/2811921837/
Granted, I did use DRI for most of the shots but I probably could have pulled back (most) the data without using DRI from my RAW files.
Patience and trial and error.
No post processing except a little saturation, noise reduction and sharpening. Gotta do some of that with RAW.
Full agreement on the gorillapod. I got the gorilla slr zoom and it’s been awesome. Great to have a tripod in my bag all the time.