
In sports and wildlife shooting, it’s all about getting that one particular moment that happens within a fraction of a second. Mastering the techniques to shooting sports will be able to help you progress as a photographer as those skills can be used in other forms such as photojournalism, weddings and street candids. My mentor, who has shot NY Knick games, has been kind enough to pass along some of his knowledge to me.
Here are 7 quick tips for those of you wanting to get better at shooting sports and fast action. Hint: You don’t need a camera that shoots 8fps like the Canon 7D, but it can help.
Note: Several of the photos in this article are from a recent trip to a Medieval Festival where the chance to really use the correct lenses and a better quality camera was presented to me.
1. Get The Right Lenses

To shoot sports, you’re usually best off with telephoto lenses. A lens with a max aperture of F2.8 will do well because you can do more with less light, and you can always stop it down if the lighting permits. As for focal lengths, you may find yourself shooting more at the longer end of your lens.
For the stuff I’ve shot, 135-200mm has usually done fine. To be fair, I’ve shot with an Olympus system where the lens’ crop factor is 2x or with a Canon 5D Mk II where there is no crop factor. Don’t spend too much time zooming in and out though or else you can lose your shot.
2. Use a Monopod if You Can

While a monopod is not always an option, it can be a life saver if you are going to be shooting for an extended period of time. This is especially true with longer lenses. Monopods, like the Manfrotto 679B, help you reduce camera shake and make more effective use of slower shutter speeds (see tip #6).
By letting a monopod hold the weight of your camera and lens, you will be slower to fatigue and your back, neck and arms will thank you the next day. Most importantly, you’ll get more keepers out of you day’s shooting, which is what we’re after anyway, right?
3. Frame it Tight
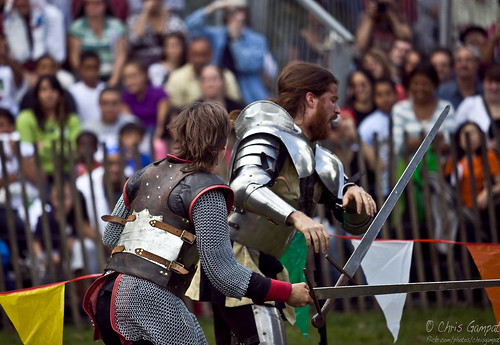
The above photo could be tighter depending on the photographer’s preferences. However, this framing shows an exciting moment, that this is a spectator sport, emotions, etc. While these two infantry men were dueling, the knight wearing red knocked the sword out of the hand of his combatant. This image captures that exact moment right before he fell.
Ensure that your framing shows what you want to get across and nothing more. That’s very important in sports photography as we usually see lots of wide to telephoto shots when watching the game from the comfort of our living rooms.
4. Capture the Emotions
Emotions are everything in a game and every athlete displays them. Shooting these emotions during exciting moments can work out well to your benefit because it will help you with portraiture, street candids, weddings, etc.
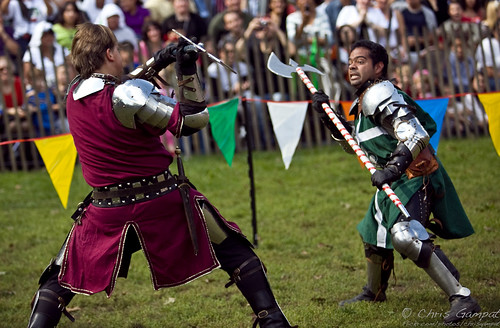
In sports, it’s all about the players. Basketball and tennis players always display emotions and it’s easy to see because their faces aren’t obstructed. In a game like football, it can be harder to capture these moments and it requires more from the photographer because body language has to be read. The photo above shows off the distress in the green knight as he’s dangerously close to his opponents axe.
5. Time Your Shot to Pull Off an Exciting Photo
This all varies on which sport you’re shooting. In baseball it can be a well-timed slide, the moment the ball hits the bat (or right before it), an excellent catch, etc. In basketball and football, the athletes can be in the air. Those are amazing shots to catch and require high shutter speeds and often high ISO shooting.
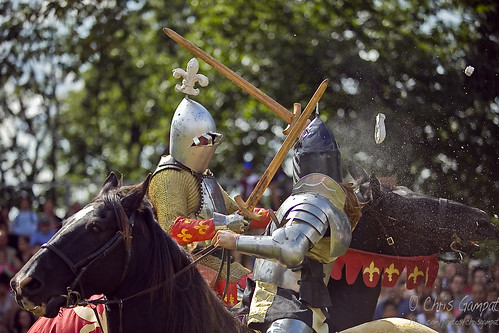
Granted though, if you pay attention well and predict the athletes movements you don’t always need to shoot at 8fps. I’ve never shot above 3.5fps for sports. It’s all about looking through your viewfinder, framing in tightly to really focus on what you’re looking for and releasing the shutter button at that critical moment. In the above shot, the point of the game was for the mounted knight to destroy his opponent’s standard (which was placed on his head.)
6. Use Shutter Speed to Show Motion

You can use shutter speed to help show off the action that’s going on in front of you. Whether you are using a fast shutter speed to freeze someone midair or using a slower shutter speed to convey a sense of motion by panning and creating a blur, shutter speed is a key component of the sports photographer’s creative vision. Use it wisely and you will create motion within a still image.
7. Keep Your Eye in the Viewfinder (most of the time)
The importance of this cannot be stressed enough. You need to always pay attention because you will never get another chance to get a shot like the one that you missed. Take your eye out of the viewfinder if you get lost and need to figure out what’s going on. After that, focus on what you’re going to shoot and follow that subject accordingly.
What other tips for shooting sports and action do you have to offer beginners?


This article is for beginners, but the first tip is to get very expensive lenses (f/2.8 * 135~300mm). That doesn’t really help a beginner, and would probably deter many from reading the other very useful tips in the article.
FL should be chosen based on how close you can get to the action and/or what perspective is required. For most amateur sports, it’s quite possible to get close to the action. Often a lenses in the 28 ~ 50mm equivalent focal lengths are enough. A beginner should focus on getting as close to the action as possible, and after that using what lenses they have to get the most out of them.
Get close to where the action happens. For example, in a bicycle-race the riders will almost always take the same line through a tight corner. Therefore, pre-focus and pre-meter on the spot that they will pass through. Get on the inside of the corner and the rider will be almost equidistant from the photographer for several seconds. Same applies for a lot of other sports, especially any sport on a track. For basketball or hockey, most of the action happens just in front of the basket or net so set up there.
For equipment, a really powerful flash (GN~50)is a best first investment (althought the power is not the point). Using flash as primary light source allows best freezing of action and shooting at smaller apertures (~f/8) gives greater leeway in DOF than shooting f/2.8 (and more in focus images) and those smaller aperatures are acceptably sharp on even beginner lenses. The reason a powerful flash is important is that the power can be harnessed. A stronger flash can be used at a smaller aperture which not only improves DOF but may be necessary for outdoor flash usage. A stronger flash also recycles faster and most flashes in that level support second-curtain sync.
Nothing makes me chuckle like going to a local bike race and see photographers, amateur and pro alike, struggling to back up enough to use their 300mm lenses.
thank you for your great explanation
I usually keep both my eyes open, one on the viewfinder and the other watching the field. This way, whenever I switch from one eye to the other I’m always tracking the same subject. It is hard at first but it really get easier once you get used to it. One other thing is to get to the location as early as possible to decide and book the best places for the shots.
Like a sniper, and that is best.
I have found that while shooting basketball even at a high school level, a flash is not permitted under the net or against the wall. With the action being under the net a flash can interfere with a player’s shot. Also with the action under the net the closest you can usually get is to the right or left of the court. Sitting to the left of the basket is a good place to start because most players’ layup with their right hand and it’s best to shoot the players face. When considering the poor lighting in most gyms and the limit’s on flash use, a F2.8 lens or lower is necessary for this sport unless your gym has great lighting or it’s daytime with windows. A flash also limits your ability for continuous shooting which for a beginner it is helpful in getting the best shot. A good lens and a camera that shoots at 3200 ISO will get you the shots you want. I would invest in a better lens before spending the money on a better camera. Trade your camera up later. If an F2.8 lens is out of you reach,you can shoot with a flash but stay on the side of the court so you are not shooting into the players eyes under the net. In some Gyms, you will be restricted anyway without a press pass. Good luck, be respectful of rules and have fun.