
There was a time as a business owner where I was inefficient. I was sending contracts with physical paper in the mail, waiting for checks, sending DVDs, and taking my sweet time with editing. Editing was especially time-consuming. I was editing on a MacBook Air that had a minimal four gigs of memory. You’d think I was editing with Picasa, but I was actually running Photoshop on that little thing. It took forever for images to save and it added hundreds of hours onto a task that should have been as efficient and straightforward as possible.
Of course, over time I became a better photographer, taking better images in camera that needed less editing. Eventually, I moved to Lightroom, and that was a little bit faster. Then I got a computer with more memory and Lightroom ran even faster. Still, I used to spend ages waiting for an image to even render from its thumbnail in Lightroom so that I could do my culling process. It took forever.
As I transitioned from a part-time photographer who didn’t know anything about time management into the queen of automation, I inevitably came across Photo Mechanic. If you use it, you likely know how deep my love goes for this program because you were probably in my shoes, staring at that Mac rainbow beachball of death as it spins endlessly in front of your computer. While you waited for things to load you’d probably open up Facebook and find yourself distracted for hours, never getting your editing done as fast as possible.
Thinking about how much time I lost in those years is painful. Now I have Photo Mechanic, which is my primary culling tool. In general, I use it to cull images from weddings and engagement shoots. I don’t think the creators of Photo Mechanic understood how useful it would be for wedding photographers who cull tens of thousands of images a year. Photo Mechanic was a program that wasn’t initially created for wedding photographers but is so useful for us.
My workflow starts when I come home and unload all of my images onto external drives (and backups). First I import everything and save in multiple locations, and then I can start the process of editing. Photo Mechanic is always my first step. My general use of it is pretty simple: I open up the folder of images, sort them by capture time and I go through and tag the images I want to edit later in Lightroom.
Since I have used Photo Mechanic for so long, I can cull a wedding pretty quickly. Once I’ve tagged the images that I want, I can select them to drag and drop into Lightroom for pixel editing. Instead of importing images I won’t use into Lightroom, I import only the photos I want to edit, which makes Lightroom run much quicker. Of course, computer upgrades and awesome memory help it run faster too, but nothing is quicker than culling in Photo Mechanic.
However, Photo Mechanic doesn’t have to be limited to a tool used only for culling for clients. Aftera wedding or a photo session is delivered to a client, there are many other situations that we might have to cull those images for. As an example, if you’re submitting your work to a publisher or creating a post on your blog, you have to select your best images for those scenarios. Some photographers cull for blogging, publications, and the wedding client simultaneously, but that’s too much for my brain. When I cull for editing, I’m culling for only myself and my clients..Then, when I’m submitting to a publisher at a later date, I’ll go back in and select images for them. For me, it’s too much to make decisions for all those different people all at once.
As an aside, if you publish your work on blogs other than your own or in magazines, you know that publishers have special requests. Publishers may be looking for specific shots, verticals over horizontals, or a certain number of images they want. Photo Mechanic makes it easy for our visually-inclined selves to quickly sort through all of our photographs in a matter of minutes.
This quick fix is the reason I rely on it for tight deadlines. Sometimes a publication opportunity pops up at the last minute. They may need content for an article within just a few days. I always know I can open up Photo Mechanic and find what they need in just a few minutes. I can also save my publishers’ valuable time by sending them a few photos instead of an entire gallery to sift through.. Being quick and making things simple for publishers is going to increase your value for being published and make people want to showcase your work!
Not all wedding and portrait photographers are familiar with Photo Mechanic, so here are five of my favorite tips for getting the most out of Photo Mechanic, you’re using it to cull for your Lightroom editing, for publication, or to sort images to meet a deadline.
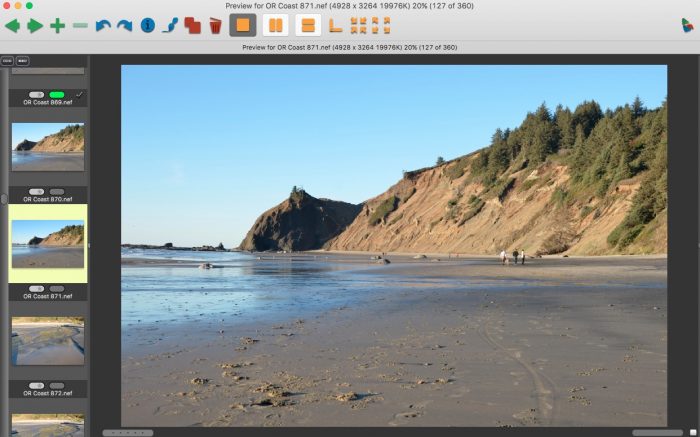
1. Photo Mechanic is not a sophisticated tool to use. You can cull quickly on the most basic level without using the extra options inside the software. To start culling simply, just open a folder of your images inside Photo Mechanic, double-click the first image in that folder once it has loaded. A new screen will pop up with thumbnails on the side and the larger image. Just use your keyboard shortcuts to bust through culling fast. Use the down arrow to go from one image to the next, and use the “T” button to tag any image you want to edit or use for a project. When you finish, you have a set of your most relevant images ready for editing.
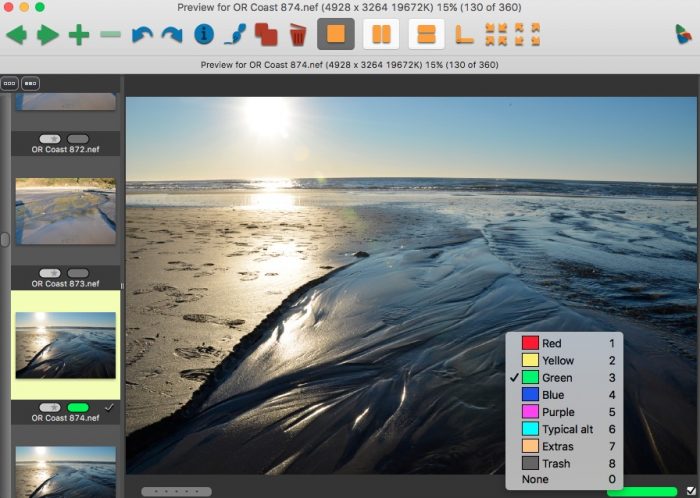
2. For more complex sorting, you can also tag images using various colors or other options to group them together for different projects. If you’re tagging raw images to keep those raw images stored somewhere, you can always come back and reopen the folder with the raw images and see what tags and color options you used initially. If you ever need to go back and look through a set of images, it’s useful to easily navigate through your photos to see your original thoughts and make any fixes you might need in the future.
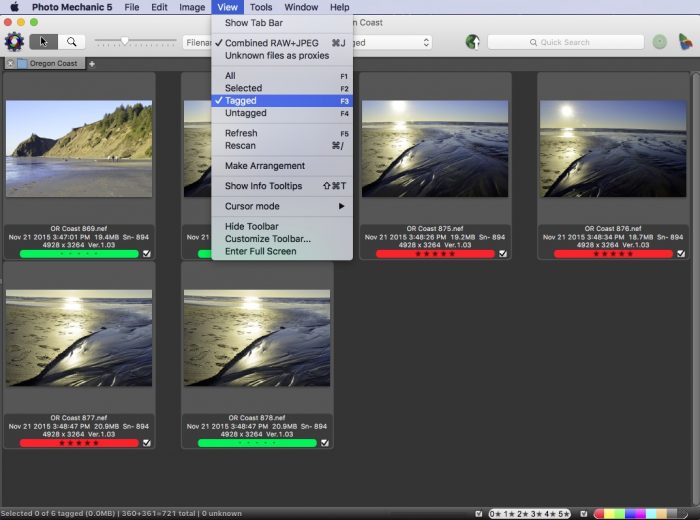
3. For easy culling and editing, you can select the tagged images you want to edit anddrag and drop them right into Lightroom. This helps keep your Lightroom catalog clean and fast since you aren’t importing images you don’t want to use.
4. Don’t limit your use of Photo Mechanic to culling just for your pixel editing. Use it to cull for all kinds of situations like for blog posts and sending to publishers. Make culling faster and easier in all aspects of your photography business.
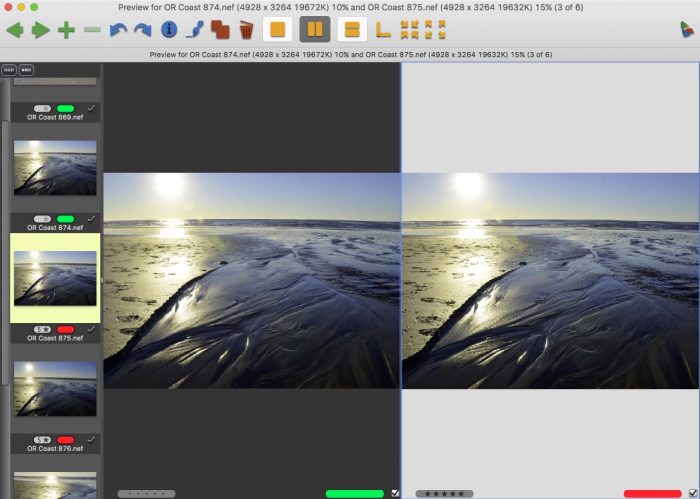
5. For wedding and portrait photographers who have a difficult time selecting images, make sure you sort the images by capture time in Photo Mechanic before you open them to start the quick culling process. Use the arrow keys to go back and forth between images. You can even compare two similar images at once by using the side-by-side view option to those difficult culling decisions even quicker.
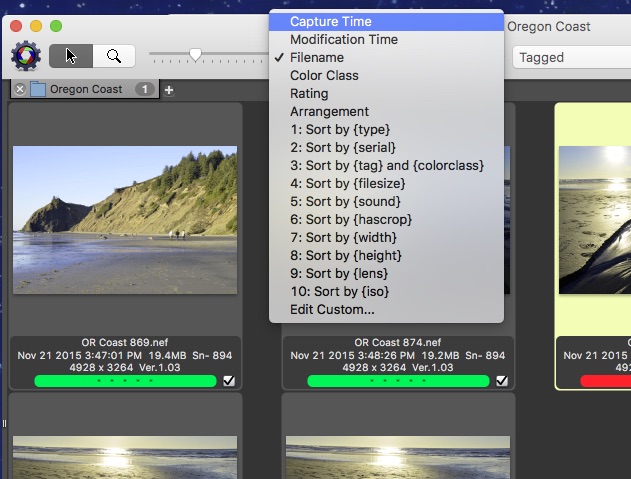
Photo Mechanic is an incredible tool that not enough photographers are utilizing. With its instant-loading capabilities and quick culling and sorting options, you can use it far beyond the scope of culling for pixel editing and bring it into your workflow for all kinds of things, including blogging and submitting for publication. The faster you can edit and meet deadlines for clients and publishers; the more pleased your customers will be. The biggest benefit to a faster culling process is that it leads to rapid editing and delivering images to my clients more quickly. In the end, fast image delivery leads to higher print sales. I love that a simple investment into a tool that specializes in fast workflow could result in increased revenue and happier clients and publishers!
 Carrie Swails is a wedding photographer and owner of Photography Awesomesauce and Rock Your Weird. She has been photographing nerdy, costumed, offbeat weddings and speaking and educating creatives and photographers for close to a decade. Her site, Photography Awesomesauce, has helped over 8 million readers get help with their photography business. Her business Rock Your Weird has helped hundreds of women find self-compassion.


Nice to see another PhotoMechanic enthusiast born. Another workflow idea I picked of from a colleague – after culling your images, drop them into a sub folder named Selects that is located in the folder with your original capture. Import those into Lightroom and edit there. Output into separate folders for blog images, images for clients, images for publications, etc. Edits stay in the Selects folder and you can easily output different sizes and formats, plus do finished retouching in Photoshop depending on requests and sales needs.
You must be awesome photographer if you even don’t need to edit your pics in LR. Congrats!
I started using Photo Mechanic for Culling last week and your guide helped a lot to understand that great piece of software. As wedding photographer I always have the problem of having no time. At least the time consuming process of culling now is like 50% faster than using Lightroom.
Best greetings from Berlin,
Alex